

How to start running for fitness: a practical beginner plan
By Eva Elekcha · November 17, 2026

Table of contents
- How to start running for fitness and build endurance
- 1. Prepare your body
- 2. Start when out of shape
- 3. Use a treadmill
- 4. Follow a training plan
- 5. Control your running pace
- 6. Eat to support running
- 7. Hydrate in hot weather
- 8. Choose running equipment
- 9. Improve running technique
- 10. Strengthen supporting muscles
- 11. Prevent common problems
- 12. Run outdoors safely
- 13. Make running sustainable
- 14. Keep your progress
- Frequently Asked Questions
How to start running for fitness and build endurance
Running can improve cardiovascular fitness, help develop stronger muscles and bones, and give you a practical way to build regular physical activity into your week.
Beginners can start with alternating periods of walking and gentle jogging, even if they have never run before.
A useful first target is three sessions per week, with a rest day between each session and a pace that allows you to speak in short sentences.
The objective is to build a routine your body can tolerate and repeat.
The Centers for Disease Control and Prevention recommends that adults aim for at least 150 minutes of moderate intensity aerobic activity each week, or 75 minutes of vigorous activity, alongside muscle strengthening on two days.
This is a general health recommendation, not a starting requirement for someone who has been inactive.
Brisk walking counts towards moderate activity, so you can build part of that weekly total before you begin running.
Your first weeks should establish consistency, comfortable movement and adequate recovery.
1. Prepare your body
Running creates repeated impact through the feet, ankles, knees and hips, while the heart and lungs work harder to supply oxygen to active muscles.
Your ability to tolerate that workload depends on your current activity level, health, body weight, previous injuries and recovery.
Someone who already walks regularly may be ready for short jogging intervals, while a person who has spent months inactive may need several weeks of walking first.
Neither starting point is a problem.
The important decision is to choose a workload that matches your current ability.
Healthdirect advises people with an illness or injury to seek medical advice before starting a running routine.
A medical assessment is particularly sensible if you have a chronic condition, significant joint problems, unexplained breathlessness, a history of heart disease or a recent injury.
Stop exercising if you experience chest pain, faintness, severe dizziness, unusual palpitations or breathlessness that feels disproportionate to the effort.
A training plan cannot determine whether those symptoms are harmless, so do not try to push through them.
1.1 Check your starting fitness
Your first assessment should establish whether you can walk comfortably and recover normally.
You do not need a laboratory test, a fitness watch or a running track to collect useful information.
A brisk walk on a flat route can show how your breathing, legs and joints respond to sustained movement.
It also gives you a practical baseline for deciding whether to start with walking alone or introduce short jogging intervals.
Use this simple assessment before your first running session:
- Choose a flat, safe route or an indoor walking area with enough space to move freely. Wear comfortable shoes and avoid routes with heavy traffic, loose gravel or uneven surfaces.
- Walk easily for five minutes to warm up. Keep your shoulders relaxed and allow your breathing to settle into a natural rhythm.
- Increase your pace gradually until you are walking briskly, while remaining able to speak in complete sentences. Maintain that pace for 10 to 20 minutes, depending on your current ability.
- Slow down for the final five minutes. Notice whether your breathing returns towards normal and whether your legs feel stable.
- Check how you feel later that day and the following morning. Unusual pain, swelling, a limp or symptoms that persist are reasons to postpone running and seek appropriate advice.
If a 20 minute brisk walk feels difficult, use shorter walks and build their duration gradually.
If you can walk for 30 minutes without pain or unusual fatigue, you have a more useful base for a beginner run walk plan.
Berkshire Healthcare's return to running guidance uses the ability to walk for 30 minutes with no symptoms, or only low symptoms as assessed in the context of an injury, as a general readiness measure.
That is a useful reference point, but anyone recovering from an injury should follow the progression set by their physiotherapist.
1.2 Set a realistic goal
A good first goal is to complete three planned sessions per week for several weeks.
This gives you enough opportunities to practise running while leaving time for recovery between sessions.
You might eventually aim to run continuously for 30 minutes, complete a 5K event or simply maintain a regular exercise habit.
Those goals require different training timelines, so choose one that reflects your reason for starting.
Set your first goal with these steps:
- Choose a time based target, such as three 20 minute walking sessions this week. If you already walk comfortably, use three short run walk sessions instead.
- Select three days that allow a recovery day between running sessions. Monday, Wednesday and Saturday is one possible schedule, but any consistent arrangement can work.
- Define success before each session. For a beginner, success may mean completing the planned intervals at an easy effort, even if the total running time is only a few minutes.
- Record the duration, the running and walking intervals, and how you felt afterwards. A notebook or basic phone note is enough.
- Review your progress after two weeks. Repeat the same workload if it remains difficult, and increase it only when you can complete the sessions comfortably and recover between them.
Avoid setting a daily running target at the beginning.
Running every day can create more impact than your muscles, tendons and joints are prepared to handle.
Rest days are part of the training plan, not a sign that you lack discipline.
A routine that you can maintain for months is a better foundation than a demanding schedule that lasts only a few weeks.
2. Start when out of shape

If you are out of shape, begin with walking and build enough endurance to tolerate short running intervals.
You do not need to reach a particular body weight before becoming more active.
Your first task is to establish a level of movement that you can repeat without excessive fatigue or joint pain.
For some people, that means walking for five or 10 minutes at a time; others can manage half an hour from the beginning.
The National Institute of Diabetes and Digestive and Kidney Diseases advises people who have been inactive to start slowly and increase activity over time.
Walking, cycling and water based exercise can help develop aerobic fitness with less running impact.
If your current weight, joint health or medical history makes running uncomfortable, these activities can provide a useful starting point.
You can introduce jogging later, once your body tolerates regular movement.
2.1 Build a walking base
Walking prepares your body for longer periods of activity and helps establish a regular exercise schedule.
It also lets you assess how your feet, knees, hips and back respond to repeated movement.
Begin with a short walk and add a few minutes when the current duration feels manageable.
The aim is to reach a comfortable 20 to 30 minute walk before introducing jogging.
Use this progression to establish your walking routine:
- Start with a 10 minute walk at a comfortable pace on three days during the first week. If 10 minutes is too much, split the session into two shorter walks.
- Add two to five minutes to one or more walks during the following week, provided the previous sessions caused no unusual pain or fatigue.
- Continue until you can walk briskly for 20 minutes without needing to stop. Keep the pace controlled enough for you to speak in full sentences.
- Extend one or more sessions towards 30 minutes. You do not need to increase every walk at the same time.
- Complete at least one week of comfortable 20 to 30 minute walks before testing short jogging intervals.
If your legs feel unusually tired or your joints hurt, keep the same duration or reduce it.
There is no deadline for completing this stage.
A person who needs four weeks to build a walking base is following a more useful plan than someone who attempts to run too early and has to stop because of pain.
2.2 Introduce short jogs
Once brisk walking feels comfortable, add small amounts of easy jogging.
The first running intervals can be as short as 30 seconds.
This may seem brief, but it gives your body time to experience the impact and movement of running while walking periods control the total workload.
Runner's World recommends building a walking routine before adding short run intervals, with 30 minutes of continuous walking as a useful starting benchmark.
Follow this first run walk session:
- Walk easily for five minutes, then increase to a brisk pace for another five minutes. This prepares your body before the first jogging interval.
- Jog gently for 30 seconds to one minute. Use a pace that feels controlled and does not force you to gasp for air.
- Walk for two to three minutes, or until your breathing settles. Keep moving rather than stopping abruptly, unless you feel unwell.
- Repeat the run and walk pattern four to six times, depending on your fitness level. Stop the running intervals early if your form deteriorates or you develop pain.
- Finish with five minutes of easy walking. Record the number of intervals and how your legs feel the following morning.
Repeat the same session two or three times per week, with at least one recovery day between running sessions.
Do not increase the running time simply because the first interval felt easy.
The final intervals and the next day's recovery provide a better indication of whether the total session was appropriate.
2.3 Adapt for extra weight
Carrying extra body weight can increase the mechanical demand on the lower limbs during running.
That does not mean running is automatically unsuitable, but it makes gradual progression and attention to joint symptoms particularly important.
A walking base, suitable footwear and low impact cross training can help you build fitness while limiting the amount of running impact in the early stages.
Use these adjustments if running feels uncomfortable:
- Begin with brisk walking on a flat surface and avoid steep hills during the first weeks. Hills increase the effort required from your legs.
- Choose short jogging intervals and longer walking recoveries. A 30 second jog followed by three minutes of walking is a valid starting session.
- Use a treadmill, track or smooth path if uneven ground makes your steps feel unstable. Choose the surface that allows you to move comfortably and safely.
- Add cycling, swimming or water exercise on non running days if you want more aerobic activity without adding more running impact.
- Seek advice from a doctor or physiotherapist if you experience persistent knee, hip, ankle or foot pain, or if your movement changes to avoid discomfort.
Do not use running as punishment for eating or as a way to force rapid weight loss.
A sustainable routine should improve fitness and support health without leaving you exhausted or injured.
If your goal includes weight management, combine regular activity with a realistic eating pattern and seek professional advice when you need support with nutrition or a medical condition.
3. Use a treadmill

A treadmill gives beginners a controlled environment for learning how to alternate walking and running.
You can adjust the speed, keep the route flat and stop the session without having to find your way back from an outdoor route.
The machine also makes it easier to repeat the same workout and track changes in duration.
Start with a comfortable walking speed and learn the controls before adding jogging intervals.
A treadmill does not choose the correct pace for you.
The speed shown on its display is only a number, and the same setting can feel different depending on your fitness, stride and the machine.
Use your breathing and ability to speak as the main guides.
Start slowly, increase speed in small adjustments and keep the incline at zero while you learn how the belt responds.
3.1 Set up the machine
Before starting, identify the emergency stop function, safety key and speed controls.
Treadmills differ, so read the machine's instructions if you are unfamiliar with its operation.
Wear running shoes, tie your laces securely and keep loose clothing away from moving parts.
If you are using a treadmill at home, make sure it is on a stable surface with enough clear space around it.
Set up your first session in this order:
- Check that the belt is clear and that the machine is stable. Remove objects from the running area and make sure the power cable does not create a trip hazard.
- Locate the emergency stop button and safety key. If the treadmill has a clip, attach it to your clothing before you start.
- Stand on the side rails while you start the belt at its lowest walking speed. Step onto the moving belt only when it is moving slowly and you feel steady.
- Walk for several minutes and test the speed controls with small adjustments. Learn how to slow the belt and stop it before you attempt to jog.
- Keep the incline at zero for your first sessions. A flat setting makes it easier to judge your effort and establish a consistent walking and running pattern.
Do not jump onto or off a moving belt.
Slow the treadmill to a walk, use the stop control and wait until the belt stops before stepping onto the side rails or leaving the machine.
Avoid holding the handrails throughout the workout because this can change your posture and reduce the effort required to move.
Use them briefly for balance when necessary, then let your arms move naturally.
3.2 Complete your first workout
Your first treadmill workout should be simple enough to repeat.
Begin with walking, add a small number of short jogging intervals and finish with easy walking.
You do not need to use a preset workout, incline programme or speed target.
The session below is a practical starting structure for someone who can already walk comfortably.
Follow these steps:
- Walk easily for five minutes at a speed that feels comfortable. Gradually increase the pace until you are walking briskly.
- Jog gently for 30 seconds to one minute. Select a speed that allows you to maintain control and speak a few words without gasping.
- Reduce the speed to a comfortable walk for two to three minutes. Let your breathing settle before the next jogging interval.
- Repeat the jog and walk pattern four to six times. Use fewer repetitions if you are new to exercise or if the session becomes difficult.
- Walk slowly for five minutes to cool down. Reduce the speed gradually and wait for the belt to stop before stepping off.
If the first workout feels too demanding, remove the jogging intervals and complete a walking session instead.
If you finish comfortably, repeat the same workout on your next scheduled day.

Archie
Archie helps employees find desks, coordinate office days and book rooms while giving workplace managers clearer visibility into attendance, space availability…
- Visual maps simplify desk discovery
- Resource based pricing supports shared seating
- Minimum monthly charges affect small offices
- Enterprise pricing requires a custom quotation
Increase the running interval only after you can complete the full session without pain and recover normally.
3.3 Choose a suitable speed
Beginners often ask for a precise treadmill speed, but there is no universal setting that works for everyone.
Height, stride length, running experience and cardiovascular fitness all affect how a speed feels.
A number that feels like a gentle jog to one person may force another person into an uncomfortable pace.
Start at a speed that lets you run with control and adjust it in small increments.
Use the following method to find your pace:
- Begin at a slow walking speed and increase it gradually until your walk feels purposeful but comfortable.
- When you are ready to jog, raise the speed slightly. Do not jump from a slow walk to a fast run in one adjustment.
- Check your breathing after 30 seconds. If you cannot speak a short sentence, reduce the speed or return to walking.
- Pay attention to your posture and foot placement. If you are reaching forward, gripping the rails or struggling to stay centered on the belt, the speed may be too high.
- Keep the same setting for the rest of that interval if it feels comfortable. Make changes between intervals rather than repeatedly adjusting the controls while running.
You can record the speed that worked for each session, but do not treat it as a target you must beat.
Your goal is to develop a comfortable running effort.
As fitness improves, the same speed may feel easier, and you can decide whether to extend the running interval before increasing the belt speed.
3.4 Add incline gradually
An incline increases the effort required to move uphill and can place greater demands on the calves and lower limbs.
Beginners do not need to use incline during their first sessions.
A flat treadmill setting is sufficient for learning the controls, developing a steady stride and completing run walk intervals.
Add incline only after you can complete flat sessions comfortably.
If you want to introduce a small incline later, use this process:
- Complete several comfortable flat treadmill sessions before changing the incline.
- Select a low incline setting and maintain your usual walking pace. Do not increase incline and speed in the same session.
- Walk for a short interval and check whether your calves, ankles and breathing remain comfortable.
- Return to a flat setting if you feel strain or if your stride changes.
- Keep incline work separate from your first attempts to increase running duration. Change one training variable at a time.
You do not need to set the treadmill to a particular incline to make the workout effective.
The main purpose of the early sessions is to build the ability to run comfortably.
Speed, incline and longer sessions can be introduced later, one at a time.
4. Follow a training plan
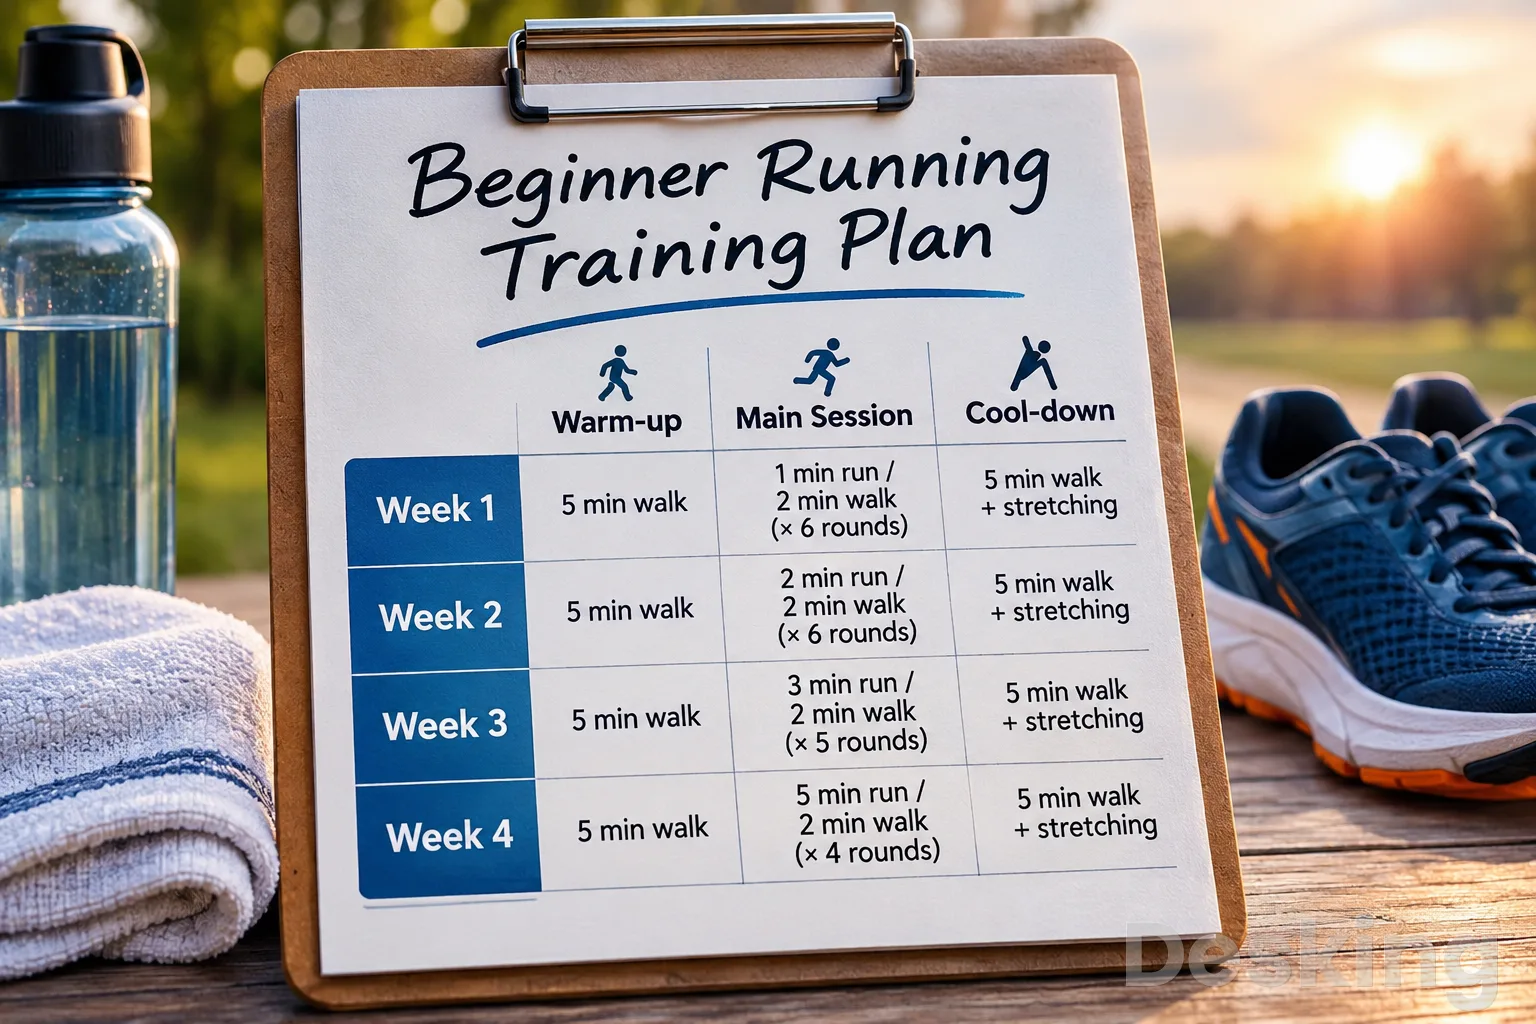
A beginner plan should increase running time gradually while preserving recovery days.
Three weekly sessions are a practical structure for many new runners because they provide regular practice without requiring daily impact.
You can add easy walking on other days, but keep the running sessions separate by at least one day.
If you are very inactive, complete the walking stage first and begin the running plan only when brisk walking feels comfortable.
The NHS Couch to 5K programme follows this principle over nine weeks.
It schedules three runs per week, alternates walking and running at the start, and gradually increases the running periods until participants can run for 30 minutes.
The programme can take longer than nine weeks if you need to repeat a stage.
The sample plan below is an independent, more conservative progression for beginners who want to start with shorter intervals.
4.1 Use a weekly schedule
The schedule should fit your current fitness and leave time for recovery.
Avoid placing the three running sessions on consecutive days.
Walking, gentle cycling or a short strength session can fit between them, provided those activities do not leave your legs too tired for the next run.
A rest day means no structured workout; ordinary daily movement is fine.
A simple weekly arrangement looks like this:
| Day | Activity | Purpose |
|---|---|---|
| Monday | Run walk session | Practise running intervals |
| Tuesday | Easy walk or rest | Support recovery |
| Wednesday | Run walk session | Repeat the current workload |
| Thursday | Strength or gentle walk | Build general strength |
| Friday | Rest | Allow recovery |
| Saturday | Run walk session | Complete the third session |
| Sunday | Rest or relaxed walk | Prepare for the next week |
Use this schedule as a framework rather than a fixed rule.
If Saturday is difficult because of work or family commitments, move the session to Sunday and adjust the next week accordingly.
Keep a recovery day between running sessions, especially during the first month.
If you feel unusually tired, replace a planned run with an easy walk or rest.
4.2 Follow a six week plan
The six week progression below is designed for a person who can already walk briskly for around 20 to 30 minutes.
It starts with short jogging periods and builds towards longer intervals.
Each session includes a five minute walking warm up and a five minute cool down, in addition to the main intervals.
Complete three sessions per week, and repeat a week whenever the workload feels too difficult.
| Week | Running interval | Walking recovery | Repetitions | Main interval time |
|---|---|---|---|---|
| 1 | 30 seconds | 2 minutes | 6 | 15 minutes |
| 2 | 1 minute | 2 minutes | 6 | 18 minutes |
| 3 | 90 seconds | 2 minutes | 6 | 21 minutes |
| 4 | 2 minutes | 2 minutes | 6 | 24 minutes |
| 5 | 3 minutes | 2 minutes | 5 | 25 minutes |
| 6 | 5 minutes | 2 minutes | 4 | 28 minutes |
The table is a progression guide, not a promise that every beginner will be ready to move forward after exactly seven days.
Keep the same week if the final intervals feel difficult, your running form changes or you experience unusual fatigue the following day.
If you need a more gradual programme with a longer progression, the NHS Couch to 5K plan provides a nine week alternative.
Do not combine the two plans or increase the workload in both at the same time.
4.3 Complete each session correctly
A training plan works only if you follow the full session, including the warm up, recovery intervals and cool down.
Running longer than the plan because you feel energetic can make the next session harder to complete.
The aim is to finish with enough energy to walk normally and recover before the next scheduled run.
Use a timer or stopwatch so you do not need to estimate the intervals while exercising.
Complete every planned session in this order:
- Prepare: Put on your running shoes, choose a safe route or set up the treadmill, and check the weather if you are running outside.
- Warm up: Walk easily for five minutes, then increase to a brisk pace for another few minutes if needed.
- Run and walk: Follow the intervals for the week. Keep the jogging pace easy and use the walking periods to regain control of your breathing.
- Cool down: Walk for five minutes or longer until your breathing returns towards normal.
- Record and recover: Note the duration, intervals and effort. Drink water, eat your usual next meal or snack, and allow time before the next run.
If you miss a session, do not double the next workout to catch up.
Continue with the next planned session when you are ready.
If you miss more than two weeks, return to an earlier stage and assess how the intervals feel.
Fitness can change during a break, particularly after illness or injury, so use your current ability rather than your previous best session.
4.4 Progress beyond six weeks
After six weeks, some beginners may be comfortable running for several minutes at a time, while others may still need walking recoveries.
Both outcomes are normal.
Your next step should depend on how well you complete the current plan, not on pressure to reach continuous running by a particular date.
You can extend the running intervals, reduce the walking recoveries or increase the total session time, but change only one of these at a time.
Use this progression method:
- Review the last three sessions and confirm that you completed the planned intervals without pain or unusual fatigue.
- Choose one change, such as adding one minute to a running interval or adding one repetition.
- Keep the walking recovery unchanged while you test the longer running interval.
- Repeat the new session at least twice before making another change.
- Return to the previous stage if the added workload affects your movement, recovery or ability to complete the next session.
Do not assume that running continuously is the only useful outcome.
Run walk training remains a valid way to exercise, including after you become fitter.
Some runners use walking breaks to control effort, manage hills or complete longer distances comfortably.
The best format is the one that supports your health and can be maintained over time.
5. Control your running pace
Running pace is the speed at which you cover a given distance, usually expressed in minutes per mile or minutes per kilometer.
Beginners often focus on pace because watches and treadmill displays make it easy to measure.
During the first weeks, however, pace is less useful than effort.
A slow, controlled jog helps you complete the intervals and recover, while a fast start can make the final part of the session unnecessarily difficult.
5.1 Use the talk test
The talk test is a simple way to judge exercise intensity without a heart rate monitor.
During an easy run, you should generally be able to speak in short sentences.
If you can only say a few words before gasping, reduce your speed or switch to walking.
This approach is particularly useful for beginners because it does not depend on age based heart rate estimates or the accuracy of a wearable device.
Apply the talk test during your next session:
- Start the running interval at a deliberately easy pace. Do not accelerate to match another runner or a treadmill display.
- After 30 to 60 seconds, try to say a short sentence aloud. Notice whether you can speak without struggling for air.
- If speaking is difficult, slow down or change to walking. Wait until your breathing settles before starting another interval.
- Repeat the test during later intervals because fatigue can make the same speed feel harder as the session continues.
- Finish the workout with enough energy to walk comfortably. A beginner session should not leave you completely exhausted.
The talk test is a guide to effort, not a medical assessment.
Unusual breathlessness, chest pain, dizziness or a racing or irregular heartbeat should never be treated as a normal sign that you need to train harder.
Stop exercising and seek appropriate medical help if these symptoms occur.
5.2 Avoid starting too fast
A common beginner mistake is to run the first interval at a pace that feels exciting, then struggle to finish the session.
This often happens because the runner judges the workout by the first minute rather than the entire session.
The correct pace should feel controlled at the beginning and remain manageable during the final intervals.
If you need to walk earlier than planned, slow the next running interval.
Use these steps to control the first few minutes:
- Begin with a gentle jog that feels almost slower than you think a run should be. You should be able to keep your shoulders relaxed and your breathing controlled.
- Keep the same effort for the first two intervals rather than increasing speed when you feel fresh.
- Check your breathing and posture after each interval. If your shoulders rise, your stride becomes heavy or your breathing becomes difficult, reduce the pace.
- Use the walking recovery to settle your breathing rather than rushing into the next interval.
- Finish at the same controlled effort. Do not sprint the final interval to improve the average pace shown on a watch.
Your pace will change with heat, humidity, hills, sleep, stress and fatigue.
A speed that feels comfortable on a cool morning may feel demanding in hot weather.
Adjust the effort to the conditions rather than trying to reproduce the same pace every time.
5.3 Understand distance and time
Time based training is often easier for beginners than distance based training.
You can complete a 20 minute run walk session on a treadmill, a track or a quiet road without needing to calculate a route.
Distance becomes more useful when you start preparing for a specific event, such as a 5K.
Until then, focus on the amount of time you can move comfortably.
Use these steps if you want to begin tracking distance:
- Complete your planned session without changing the intervals to reach a distance target.
- Record the distance shown by your treadmill or running app after the workout.
- Compare similar sessions on the same route or machine, since hills and different surfaces affect pace.
- Review the distance over several weeks rather than judging progress from one workout.
- Increase time or distance gradually, and do not add extra running simply because the recorded distance is lower than expected.
GPS watches and phone apps can be useful, but their distance readings may vary around tall buildings, trees and other obstacles.
Treadmill displays also depend on machine calibration and settings.
Treat these measurements as estimates for personal tracking, not exact evidence of your fitness.
6. Eat to support running

Nutrition supports the energy demands of running and the recovery process afterwards.
Beginners do not need a special diet, expensive supplements or a complicated meal plan.
Regular meals with carbohydrates, protein, healthy fats, fruit, vegetables and enough fluids provide a sound starting point.
The amount you need depends on your body, daily activity, session length and health goals.
The Academy of Nutrition and Dietetics explains that runners need enough energy and nutrients to support both daily needs and exercise.
Johns Hopkins Medicine also recommends a balanced eating pattern that includes carbohydrate sources such as rice, bread and oatmeal, lean protein, fruit, vegetables and healthy fats.
A beginner running routine usually does not justify extreme carbohydrate loading or restrictive dieting.
6.1 Eat before a run
The best pre run meal depends on the time of day and how long before exercise you can eat.
A large meal immediately before running may cause stomach discomfort, particularly if it contains a lot of fat or fiber.
A smaller carbohydrate based snack can be useful when you are hungry or have not eaten for several hours.
The NHS recommends a light carbohydrate based snack one to two hours before running, with examples such as a banana or toast.
Use this simple approach before a session:
- If you have two to three hours before running, eat a normal meal that includes a carbohydrate source and some protein. Rice with eggs, chicken with potatoes or oatmeal with yogurt are practical examples.
- If you have one to two hours, choose a smaller snack that is easy to digest, such as a banana, toast with honey or a small bowl of cereal.
- If you have less than an hour, keep the portion small and choose a familiar food that you know does not upset your stomach.
- Avoid trying a new spicy, greasy or very high fiber meal immediately before running. Save unfamiliar foods for a day when you are not training.
- Notice how your stomach feels during the session and adjust the timing or portion at the next workout.
You do not need to eat before every short beginner run if you feel comfortable and have eaten normally during the day.
Some people prefer an early morning session before breakfast, while others feel better after a small snack.
There is no need to force a meal if it causes discomfort, but avoid using fasted running as a shortcut for rapid weight loss.
6.2 Choose useful foods
A balanced eating pattern supports training across the whole week.
Carbohydrates provide an important energy source for running, protein supports tissue repair and muscle maintenance, and fats contribute to normal body functions.
Fruit and vegetables supply fiber, vitamins and minerals.
You do not need to calculate every nutrient in each meal to eat well as a beginner.
Build your regular meals around these food groups:
- Carbohydrates: Include rice, potatoes, oats, bread, pasta, corn, beans or fruit. Choose portions that suit your appetite and activity level.
- Protein: Include eggs, fish, chicken, lean meat, yogurt, milk, beans, lentils or tofu. Spread protein sources across your normal meals.
- Fruit and vegetables: Eat a variety of fresh or frozen produce. Bananas, oranges, leafy vegetables, tomatoes and carrots are practical options.
- Healthy fats: Use moderate portions of nuts, seeds, avocado and olive oil. These foods contribute energy and essential fatty acids.
- Fluids: Drink water regularly through the day and pay attention to thirst, heat and sweat loss during exercise.
A runner does not need to eliminate bread, rice or other carbohydrate foods to improve fitness.
These foods can support training when eaten as part of a balanced diet.
Equally, adding large amounts of food simply because you have started running can make weight management harder.
Match your portions to your appetite, training and overall health goals.
6.3 Plan meals around training
Meal timing can make running more comfortable, especially if you train early in the morning or after work.
A full meal needs more time to digest than a small snack.
If you run after a long gap without food, a light snack may help you feel more comfortable.
The American Academy of Nutrition and Dietetics notes that easily digested carbohydrate foods can be useful before running, while carbohydrate and protein foods support recovery after exercise.
Use this example meal structure as a guide:
| Timing | Food approach | Practical examples |
|---|---|---|
| 2 to 3 hours before | Normal meal with carbohydrates and protein | Rice with chicken, eggs with toast, oatmeal with yogurt |
| 1 to 2 hours before | Small carbohydrate based snack | Banana, toast with honey, cereal, fruit and yogurt |
| Less than 1 hour before | Small familiar snack if hungry | Half a banana, a little toast, applesauce |
| After running | Normal meal or snack with carbohydrates and protein | Yogurt with fruit, eggs and bread, chicken with rice |
| Rest of the day | Balanced meals and regular fluids | Vegetables, fruit, beans, fish, potatoes and water |
These are examples, not strict prescriptions.
The right portion depends on your appetite, body size, training duration and tolerance.
A 20 minute beginner run does not require the same preparation as a long distance race.
Start with familiar foods and adjust only when you notice a clear problem, such as hunger, nausea or low energy during a session.
6.4 Recover with food
After a run, your body needs fluids and nutrients to recover.
A short beginner session usually does not require a special recovery product.
A normal meal containing carbohydrates and protein is sufficient for many people.
Johns Hopkins Medicine recommends a snack or light meal with carbohydrate and protein after running to support energy replenishment and muscle recovery.
Use these steps after your workout:
- Drink water according to your thirst and the conditions. If you have been sweating heavily, continue drinking gradually after the session.
- If your next meal is soon, eat that meal rather than buying a separate recovery product.
- Include a carbohydrate source such as rice, bread, potatoes, oats or fruit.
- Include a protein source such as eggs, yogurt, fish, chicken, beans or milk.
- If you cannot eat a full meal, choose a practical snack such as yogurt and fruit or a peanut butter sandwich.
You do not need to consume a protein shake immediately after every beginner run.
Supplements may be convenient for some people, but they are not a replacement for normal meals.
If you have a medical condition that affects nutrition, kidney function, blood sugar or fluid balance, seek individual advice before using sports supplements.
6.5 Avoid unnecessary supplements
Sports drinks, energy gels, electrolyte tablets and protein powders are marketed to runners, but most beginners do not need them for short sessions.
For activity lasting less than an hour, water is generally sufficient for hydration, according to the American Orthopaedic Society for Sports Medicine.
A normal meal pattern can supply the carbohydrates and protein required for beginner training.
Special products become more relevant as duration, intensity or environmental demands increase.
Use this checklist before buying a supplement:
- Identify the specific problem you want to solve, such as difficulty eating after training or a long session in hot weather.
- Check whether normal food and water can meet that need. A banana, yogurt or ordinary meal may be sufficient.
- Read the ingredients and serving information. Avoid products that promise rapid fat loss, instant endurance or guaranteed performance.
- Check for caffeine, stimulants, high sugar content or ingredients that may interact with medication.
- Ask a qualified healthcare professional or registered dietitian if you have a medical condition, take medication or are unsure whether a supplement is appropriate.
Do not buy energy gels for 15 to 30 minute beginner sessions.
They are designed to provide carbohydrates during longer endurance activity, and they add unnecessary cost for most short workouts.
Build your routine with ordinary food first, then reconsider sports nutrition products if your training duration increases substantially.
7. Hydrate in hot weather

Hydration matters because running increases fluid loss through sweat, and hot or humid conditions can make that loss greater.
You do not need to carry a large sports drink for every short run, but you should start your session normally hydrated and have access to water when conditions require it.
The American Orthopaedic Society for Sports Medicine states that water is generally sufficient for exercise lasting less than an hour.
Longer sessions or exercise in hot and humid conditions may require more attention to fluid and electrolyte replacement.
7.1 Drink before running
Do not wait until you feel very thirsty after a hot session to think about hydration.
Drink water regularly during the day, particularly if the weather is warm or you spend time outdoors.
You do not need to force large volumes immediately before running, since too much fluid at once can cause stomach discomfort.
The aim is to begin the session comfortably hydrated.
Prepare before your run with these steps:
- Drink water with your normal meals and throughout the day. Do not try to compensate for an entire day without fluids just before exercise.
- Have a glass of water during the hours before your run if you are thirsty or have not had much to drink.
- Check the weather forecast and choose a cooler time of day when temperatures are high.
- Take a small bottle if your route is long, you are running in heat or you will be away from drinking water.
- Avoid drinking a large amount immediately before starting. Give yourself time to drink comfortably and use the bathroom if necessary.
Your needs will vary with body size, sweat rate, temperature and exercise duration.
People who take medication that affects fluid balance or have kidney, heart or other medical conditions should follow individual medical advice rather than general hydration targets.
7.2 Drink during exercise
A short beginner session may not require you to drink while running, particularly in mild weather.
In hot conditions, however, even a short workout can feel more demanding.
Carry water if you are unsure about access to drinking facilities, and take small sips when needed.
Do not force yourself to drink continuously if you are comfortable and the session is brief.
Use these guidelines during your run:
- For a short session in mild weather, drink before and after according to thirst. You may not need to carry a bottle.
- For a longer session or a hot day, take water with you or choose a route with safe access to drinking water.
- Take small sips during walking recoveries if you feel thirsty. Avoid drinking so much that your stomach feels uncomfortable.
- Reduce your pace or stop if you develop headache, dizziness, nausea, unusual weakness or confusion in the heat.
- Move to a cooler place and seek medical help if you suspect heat illness, especially if symptoms are severe or do not improve.
Do not use thirst alone as a reason to ignore extreme heat or symptoms of heat illness.
Archie
Archie helps employees find desks, coordinate office days and book rooms while giving workplace managers clearer visibility into attendance, space availability…
- Visual maps simplify desk discovery
- Resource based pricing supports shared seating
- Minimum monthly charges affect small offices
- Enterprise pricing requires a custom quotation
Hydration supports safe exercise, but it cannot make dangerous weather conditions safe.
Shorten the session, move indoors or rest when the temperature and humidity make outdoor running uncomfortable.
7.3 Replace lost fluids
After running, drink water and eat a normal meal or snack.
If you have completed a short session and feel well, there is usually no need for a special electrolyte product.
Heavy sweating, prolonged activity and hot conditions can increase the need to replace sodium and other electrolytes.
The right approach depends on the amount of fluid lost and your individual health.
Follow this recovery process:
- Drink water gradually after the session rather than consuming a large quantity at once.
- Eat your next normal meal, including foods that naturally contain minerals such as vegetables, fruit, dairy, beans or other suitable sources.
- If your clothing is heavily soaked with sweat or you have been exercising for a long time in heat, pay closer attention to fluid replacement.
- Avoid taking salt tablets or concentrated electrolyte products without a clear need or professional advice.
- If you experience persistent dizziness, confusion, vomiting or signs of severe heat illness, seek urgent medical assistance.
Overhydration can also be harmful, particularly when someone drinks excessive amounts of plain water during prolonged exercise.
Do not follow arbitrary litre targets without considering your body, sweat loss and conditions.
For the short sessions in a beginner plan, regular drinking and sensible access to water are usually adequate.
8. Choose running equipment
You can begin running with a small amount of equipment.
Comfortable running shoes, clothing that allows free movement and a way to carry water when needed are enough for most short sessions.
You do not need a specialist watch, expensive running clothes or a collection of accessories.
Spend your attention on fit, comfort, visibility and safety.
8.1 Find suitable shoes
Running shoes should feel comfortable from the first fitting.
The best choice depends on your foot shape, comfort and the way you move.
The American Academy of Orthopaedic Surgeons advises runners to choose footwear that fits properly and suits the activity.
Oregon Health and Science University also emphasizes comfort and trying shoes in person, rather than relying on marketing claims about a particular shoe design.
Use this process when choosing your first pair:
- Try shoes later in the day if your feet tend to swell. Wear the socks you expect to use for running.
- Check that your toes have enough room to move and are not pressed against the front of the shoe. Your heel should feel secure without painful rubbing.
- Walk around the store or fitting area for several minutes. Notice any pressure points, slipping or discomfort.
- If possible, try more than one model and compare comfort rather than choosing by appearance or the highest price.
- Start with short sessions in the new shoes. Check your feet afterwards for blisters, rubbing or areas of unusual pressure.
Do not assume that a shoe advertised for a particular foot type will automatically solve pain.
Footwear can improve comfort, but persistent symptoms may have another cause.
Replace shoes when the cushioning, outsole or structure has deteriorated enough to affect comfort and stability.
There is no single replacement distance that applies to every runner because wear depends on body weight, surface, shoe construction and use.
8.2 Select comfortable clothing
Clothing should allow you to move freely and help you manage heat, sun and visibility.
Heavy clothing can make a warm session uncomfortable, while loose garments may rub or interfere with movement.
Choose breathable items that suit the local weather.
In hot conditions, schedule sessions during cooler parts of the day and avoid exposing yourself to excessive heat.
Prepare your clothing with these steps:
- Choose lightweight clothing that does not restrict your hips, knees or arms. Avoid fabrics that become uncomfortable when wet with sweat.
- Wear socks that fit without bunching inside your shoes. Check that seams do not rub against your toes or heels.
- Use a hat and sunscreen when running outdoors in strong sunlight. Choose shaded routes where possible.
- Wear reflective clothing or a light when visibility is poor. Select a route where drivers and other road users can see you.
- Carry a phone and water when the route, weather or duration makes them necessary. Keep valuables secure so they do not interfere with your stride.
You do not need to buy a complete running wardrobe before your first session.
Start with suitable clothing you already own and replace items only when they cause discomfort or fail to meet a practical need.
In warm climates, breathable fabric and sun protection may matter more than specialized winter running layers.
8.3 Use helpful accessories
Accessories can make running more convenient, but each item should solve a practical problem.
A watch can time intervals, a phone can provide directions and a small belt can carry keys.
A beginner does not need every available device.
Buy equipment only when it improves comfort, safety or the ability to follow your plan.
Consider these items in order of usefulness:
- Phone or stopwatch: Use a timer to manage run and walk intervals. A basic phone timer is enough for the first training plan.
- Reflective vest or light: Use reflective equipment when running near roads or in low light. Visibility matters more than appearance.
- Running belt or armband: Choose a secure holder if you need to carry a phone, keys or identification. Make sure it does not bounce or rub.
- Water bottle: Carry one when the route is long, water access is limited or the weather is hot. A small bottle is sufficient for many beginner sessions.
- Sports watch: Consider one later if you want to track distance, heart rate or weekly activity. It is optional and should not dictate your pace.
Headphones are also optional.
If you use them outdoors, keep the volume low enough to hear traffic, bicycles and other people.
Open ear or one ear listening may help preserve awareness, depending on local conditions and device design.
Do not let music or a podcast distract you from road crossings, changing surfaces or signs of fatigue.
8.4 Prepare a simple kit
Preparing your equipment before each session reduces delays and helps you avoid forgetting essentials.
You do not need a large gym bag for a short run.
Keep a small kit with the items you use regularly, and adjust it for the weather and route.
This is particularly useful if you train before work or after a busy day.
Use this preparation routine:
- Place your running shoes and socks together so you can check their condition before leaving.
- Choose clothing based on the forecast, including a hat or reflective layer when needed.
- Charge your phone or watch if you plan to use it for timing or navigation.
- Pack keys, identification and water in a secure belt or pocket.
- Check the route and tell someone where you are going if you will run alone in an unfamiliar area.
A simple kit is enough for most beginners.
Avoid carrying equipment that changes your posture, bounces excessively or distracts you from the session.
As your training becomes longer or more specialized, you can decide whether additional gear is worth the cost.
9. Improve running technique

Running technique affects comfort and how efficiently you move, but beginners do not need to rebuild their entire stride.
Start with a relaxed posture, short natural steps and arms that move freely.
Avoid forcing a particular foot strike or copying the form of an experienced runner.
The most useful early technique is one that allows you to run without unnecessary tension and maintain control through each interval.
9.1 Relax your posture
Your first priority is to maintain a relaxed and repeatable movement pattern.
Excessive reaching with the feet can make running feel heavy, while tense shoulders and clenched hands add unnecessary effort.
You should be able to maintain your posture throughout a short interval without fighting the movement.
If you become too tired to run comfortably, switch to walking.
Use these cues during your next session:
- Keep your head level: Look ahead along your route rather than constantly looking down at your feet. Keep your neck relaxed and avoid pushing your chin forward.
- Relax your shoulders: Let your shoulders sit naturally and keep your hands loose. Your elbows can remain bent while your arms swing forward and backward.
- Use comfortable steps: Take short, natural strides instead of reaching far ahead with each foot. Let your feet land where your body can move forward without a forced movement.
- Keep your torso steady: Maintain a natural upright position with a slight forward inclination from the ankles if that feels comfortable. Avoid bending sharply at the waist.
- Stop before fatigue changes your movement: If you begin to limp, stumble or alter your stride to avoid discomfort, end the running interval and walk. Do not try to preserve a running target at the expense of your movement.
Do not spend the entire run thinking about every part of your body.
Choose one cue for a session, such as relaxed shoulders, and let the rest of your movement remain natural.
A physical therapist or running coach can help if you have persistent discomfort or a specific movement problem.
9.2 Let your arms move naturally
Your arms help balance the movement of your legs.
Excessive arm tension can make running feel harder, while holding your hands rigidly near your chest may restrict comfortable movement.
Keep your elbows bent naturally and allow your arms to swing forward and backward without crossing forcefully in front of your body.
Practise relaxed arm movement with these steps:
- Stand upright and let your shoulders drop away from your ears.
- Bend your elbows comfortably and keep your hands relaxed rather than clenched.
- Walk briskly while allowing your arms to swing naturally in opposition to your legs.
- Add a short jogging interval and maintain the same relaxed movement.
- If your shoulders become tense, lower your arms briefly during a walking recovery and reset your posture.
There is no need to force a precise elbow angle or copy a professional runner's arm movement.
Comfort and control are more useful than a rigid technical checklist.
If an arm or shoulder movement causes pain, stop and seek advice rather than trying to correct it through repeated practice.
9.3 Avoid overstriding
Overstriding occurs when the foot reaches too far ahead of the body during a running step.
It can make the movement feel abrupt and may increase braking forces.
Beginners sometimes overstride when they try to run faster or take long steps to cover more ground.
Shorter, natural steps can help maintain a smoother rhythm without forcing a particular cadence.
Use this simple practice:
- Begin with a slow jog on a flat surface.
- Notice whether your feet reach far ahead of your body or whether your steps feel heavy.
- Shorten the stride slightly if you are reaching forward, while keeping the pace comfortable.
- Avoid deliberately landing on your toes or heels. Allow your foot to contact the ground naturally.
- Return to walking if you cannot maintain a relaxed movement pattern.
Do not change your foot strike abruptly because a video or article claims that one pattern is correct for everyone.
People have different bodies, running histories and comfort levels.
If you have recurring injuries or pain, a qualified clinician can assess your movement and recommend changes suited to you.
10. Strengthen supporting muscles
Strength training helps develop the muscles that support your hips, knees, ankles and trunk.
Running itself does not provide all the strength work recommended for general health.
The CDC advises adults to include muscle strengthening activities on at least two days per week.
Beginners can start with bodyweight movements and short sessions, then increase the difficulty when they can perform each movement with control.
10.1 Start with bodyweight exercises
A short strength routine can support your running plan without requiring a gym membership.
Begin with movements that use a stable range of motion and do not cause pain.
The goal is to build general strength and movement control, not to exhaust your legs before a run.
If you have a medical condition or a history of injury, ask a qualified professional to help select appropriate exercises.
Start with this routine on non running days:
- Sit to stands: Sit on a stable chair and stand up without using your hands if possible. Complete eight to 10 controlled repetitions.
- Calf raises: Stand near a wall or stable surface, rise onto your toes and lower slowly. Complete 10 to 12 repetitions.
- Glute bridges: Lie on your back with knees bent, lift your hips gently and lower with control. Complete eight to 10 repetitions.
- Bird dogs: Start on your hands and knees, extend one arm and the opposite leg, then return slowly. Alternate sides for six to eight repetitions each.
- Wall push ups: Place your hands on a wall, bend your elbows and bring your chest towards it, then push back. Complete eight to 12 repetitions.
Start with one round of the routine and add another only when the movements feel controlled.
If a movement causes pain, stop and choose a suitable alternative.
You can also ask a qualified trainer or physiotherapist to check your technique, especially if you have a history of back, knee or shoulder problems.
10.2 Schedule strength sessions
Strength sessions should complement your running rather than make every day difficult.
Two short sessions per week are enough to establish the habit for many beginners.
Place them on days that do not interfere with your next running workout.
If your legs are very sore after strength training, reduce the number of repetitions or choose an easier session.
Use this weekly structure:
- Choose two non consecutive days for strength training, such as Tuesday and Thursday.
- Begin with one round of the bodyweight routine and rest between movements as needed.
- Keep each repetition slow and controlled. Stop the set when your form begins to deteriorate.
- Avoid demanding leg strength work immediately before a scheduled run if it makes your legs feel heavy.
- Increase repetitions gradually after you can complete the routine comfortably for several sessions.
Strength training should not become a competition with yourself.
You do not need to lift heavy weights or complete long gym sessions to support beginner running.
Consistency and controlled movement matter more than the number of exercises in a workout.
11. Prevent common problems
Beginners often experience muscle soreness when they introduce a new activity.
Mild soreness can appear after exercise, particularly when the muscles are not used to repeated movement.
Persistent pain, swelling, limping or discomfort that worsens during a run needs more attention.
The distinction matters because continuing to train through an injury can turn a manageable problem into a longer interruption.
11.1 Recognize soreness and pain
Normal post exercise soreness is often felt in the muscles and may appear later the same day or the following day.
It should gradually improve and should not prevent you from walking normally.
Pain that is sharp, localized, associated with swelling or changes your movement is a reason to stop running.
Do not assume that every painful sensation is simply part of becoming fitter.
Use this response when discomfort appears:
- Stop the running interval if you feel sharp pain, instability or a sudden change in movement.
- Walk only if you can do so comfortably. If walking hurts or you cannot bear weight normally, stop the session.
- Check the affected area for swelling, bruising or tenderness, but do not repeatedly press or manipulate an injury.
- Avoid running again until symptoms have settled and normal movement has returned. Seek professional assessment if pain persists, worsens or repeatedly returns.
- Resume at an easier stage after appropriate advice, rather than restarting at the same workload that caused the problem.
Do not use painkillers to hide symptoms so that you can complete a planned run.
Medication may reduce discomfort without addressing the cause.
If you are unsure whether a symptom is safe to train through, ask a healthcare professional or physiotherapist.
11.2 Reduce training errors
Many beginner problems arise when the total workload increases too quickly.
A runner may add more sessions, longer intervals, faster speeds and hill work in the same week.
That makes it difficult to identify which change caused excessive fatigue or discomfort.
Increase one element at a time and keep the rest of the routine stable while your body adapts.
Avoid these common training errors:
- Running too often: Keep recovery days between running sessions instead of trying to run every day during the first weeks.
- Increasing several variables: Do not add distance, speed, incline and training days at the same time. Choose one change and assess how you respond.
- Ignoring pain: Stop or reduce the workload when discomfort changes your stride or affects normal movement.
- Skipping the warm up: Begin with walking and increase the effort gradually before jogging.
- Copying advanced plans: A schedule designed for an experienced runner may not suit someone who is still building a walking base.
The often quoted 10 percent rule is not a guarantee against injury.
It can be a conservative reference for some runners, but it does not account for every starting level, injury history or training condition.
A small increase can still be too much for someone who is new to exercise.
Use your symptoms, recovery and ability to complete the current plan as the main guides.
11.3 Return after a break
A break from running can happen because of illness, injury, travel, work or family commitments.
Your previous fitness may not be the same when you return, particularly if you have been inactive for several weeks.
Do not resume with the longest session you completed before the break.
Rebuild your routine with walking and shorter intervals.
Follow this return process:
- Start with a comfortable walk and check how your body responds during the session and the following day.
- If you can walk briskly without pain, introduce short jogging intervals rather than continuous running.
- Use an earlier week of your beginner plan, even if you previously completed longer sessions.
- Complete two or three sessions at the reduced level before making any increase.
- If the break followed an injury, follow the advice of your treating clinician or physiotherapist before returning to running.
Berkshire Healthcare's return to running programme uses progressive jogging and walking intervals, with rest between sessions.
It also emphasizes that readiness depends on the person's injury and the assessment of a physiotherapist.
That distinction is important: a general beginner plan is not a substitute for a rehabilitation programme.
12. Run outdoors safely

Outdoor running gives you access to different routes, natural terrain and fresh air, but it also introduces variables that a treadmill does not have.
Traffic, uneven pavements, poor lighting, heat and weather can affect your safety and effort.
Choose routes that suit your current ability and make it easy to stop or shorten the session if necessary.
A flat, familiar route is a practical choice for the first weeks.
12.1 Choose a beginner route
A suitable beginner route should be easy to follow and allow you to walk whenever you need to.
Avoid routes that force you to run uphill for long periods or leave you far from a safe stopping point.
A short loop can be useful because you can finish early if the session becomes difficult.
Choose a surface that feels stable and comfortable underfoot.
Prepare your route with these steps:
- Start with a familiar, well lit route with a smooth surface and low traffic.
- Choose a short loop or an out and back route that allows you to return home without extending the session.
- Avoid steep hills during the first weeks. Flat terrain makes it easier to control effort and repeat the same intervals.
- Check for road crossings, construction work, loose surfaces and areas where visibility is poor.
- Tell someone your route and expected return time if you are running alone in an unfamiliar area.
Do not choose a route based only on distance or appearance.
A route that is safe for an experienced runner may be unsuitable for someone who needs frequent walking breaks.
Keep the first sessions close to home or in a supervised exercise area until you are comfortable with the routine.
12.2 Adjust for heat
Heat and humidity make running feel harder because your body must manage both exercise and temperature regulation.
In hot conditions, the same pace can create more strain than it would on a cool day.
Beginners should reduce their effort, shorten sessions and choose cooler hours.
Do not try to maintain a pace recorded during a different season or weather condition.
Use these precautions in warm weather:
- Schedule outdoor sessions early in the morning or later in the day when temperatures are lower.
- Choose shaded routes and wear lightweight clothing that allows heat to escape.
- Begin with a slower pace and extend the walking recoveries if your breathing or body temperature rises quickly.
- Carry water when the route or conditions make it necessary, and avoid long sessions in intense heat.
- Stop and move to a cooler place if you develop dizziness, nausea, headache, unusual weakness or confusion.
If the weather is too hot or humid, use an indoor treadmill or replace the run with a shorter walk.
Missing an outdoor session is preferable to exercising in conditions that put your health at risk.
If symptoms suggest heat illness, seek medical assistance rather than attempting to finish the workout.
12.3 Stay visible
Visibility matters whenever you run near roads, in low light or in areas shared with cyclists and pedestrians.
Drivers may not see a runner who wears dark clothing, especially around corners or at dawn and dusk.
Reflective clothing and a small light can make you easier to notice.
You should still choose a route that minimizes traffic exposure.
Improve your visibility with these steps:
- Wear bright or reflective clothing when visibility is reduced.
- Use a small running light or headlamp when running before sunrise or after sunset.
- Run facing oncoming traffic where local road rules and conditions allow, so you can see approaching vehicles.
- Cross roads at designated crossings and make eye contact with drivers when possible.
- Keep headphones at a low volume or leave one ear free so you can hear traffic and other people.
Do not assume that reflective clothing gives you priority on a road.
Drivers may still fail to see you, and poor lighting can make it difficult to judge distance.
Use pavements or designated paths where available, and avoid routes that require you to run in traffic.
13. Make running sustainable
A routine becomes easier to maintain when it fits your real life.
Decide in advance which days you will run and what session you will complete.
Keep your shoes and clothing ready, use a simple training log and avoid making every workout a test of performance.
A running partner or beginner programme can provide structure if you find it difficult to train alone.
13.1 Build a weekly habit
A schedule reduces the number of decisions you need to make before each workout.
Archie
Archie helps employees find desks, coordinate office days and book rooms while giving workplace managers clearer visibility into attendance, space availability…
- Visual maps simplify desk discovery
- Resource based pricing supports shared seating
- Minimum monthly charges affect small offices
- Enterprise pricing requires a custom quotation
It also helps you identify whether the plan is too demanding for your work, family or sleep routine.
Three realistic sessions are more useful than a seven day schedule that you repeatedly miss.
Keep the session length manageable so that running has a place in your week without taking over your other responsibilities.
Establish your routine with these steps:
- Choose three realistic training days and add them to your calendar. Avoid times when work, family or other regular commitments make attendance unlikely.
- Prepare your shoes, socks and clothing before the session. Keep your water and phone ready if you need them.
- Decide the workout before you leave home or start the treadmill. Do not improvise a harder session because you feel motivated.
- Track each completed workout and write one sentence about how it felt. Use the notes to decide whether to repeat or progress.
- Review your schedule at the end of each week. Move sessions when necessary, but preserve recovery time between runs.
You can use a free running plan, a basic fitness app or a paper calendar.
The tool matters less than having a clear schedule and a way to record what you complete.
Avoid comparing your early pace with the times of experienced runners.
Their training history is different, and their results do not tell you what your body should manage today.
13.2 Handle missed sessions
Missing a workout is normal.
Work, travel, poor sleep, illness and family commitments can interrupt a routine.
The mistake is trying to compensate by doubling the next session or running on consecutive days when your body needs recovery.
A sensible plan can absorb an occasional missed workout without losing its purpose.
When you miss a session, use this approach:
- Identify why you missed it. If the reason was lack of time, choose a more realistic training slot for the next week.
- If you were ill or unusually tired, wait until you feel well before resuming. Do not treat illness as a reason to train harder later.
- Return to the next planned session rather than adding the missed workout to it. Keep the original interval structure.
- If you have missed several weeks, reduce the running time and rebuild gradually. Do not assume that your previous fitness level has remained unchanged.
- Review the schedule after two weeks and adjust the days or session length if the plan repeatedly conflicts with your routine.
A consistent routine is measured over months, not by whether you complete every planned session in a single week.
The ability to restart calmly after an interruption is part of becoming a regular runner.
Keep your next workout manageable and continue from there.
13.3 Measure useful progress
Tracking can help you understand whether your routine is becoming easier.
Distance and pace are useful later, but they are not the only measures that matter to a beginner.
The time you can spend moving comfortably, the number of intervals you complete and how quickly your breathing settles can provide better early feedback.
A simple training log can reveal patterns that are difficult to remember from one week to the next.
Record the following after each session:
- Duration: Write down the total time, including warm up and cool down. This shows how much activity you completed without making speed the main measure.
- Intervals: Record how long you ran and walked. Note the number of rounds you completed.
- Effort: Rate the session from easy to very hard, using the same personal scale each time. A short note such as "comfortable" or "too fast" is useful.
- Recovery: Record whether you had unusual soreness, pain or fatigue later that day or the following morning.
- Next step: Decide whether to repeat the same session, reduce the workload or progress slightly. Base the decision on the whole session and recovery, not on one good interval.
A smartwatch can automate some of this tracking, but it is not necessary.
Avoid changing your training plan because an app labels a session as unproductive or because another runner posts a faster pace.
Your own progress is measured against your starting point.
13.4 Choose your next goal
After several weeks of regular sessions, you may notice that the same intervals feel more manageable.
Your breathing may settle sooner, your walking recoveries may feel shorter and you may finish with more energy.
These are useful signs of adaptation, but they do not mean you should immediately increase speed, distance and frequency together.
Continue to build one part of your training at a time.
When you can run for several minutes comfortably, choose a new goal.
You might aim to run continuously for 10 minutes, complete a 5K using run walk intervals, or maintain three weekly sessions for general fitness.
The NHS Couch to 5K programme offers a nine week structure that gradually builds towards 30 minutes of continuous running for many participants.
Your own timeline may be longer, and that is acceptable.
Before changing your goal, use the following steps:
- Review your training log and identify the longest running interval you can complete comfortably.
- Decide whether you want to run continuously, increase total weekly activity or prepare for a specific distance.
- Choose one goal that matches your current ability. Avoid setting a speed target if you are still working on running duration.
- Keep your three weekly sessions and recovery days while you adapt the plan to the new goal.
- Reassess after several weeks and adjust the workload according to your recovery and comfort.
Running for fitness is a long term activity.
A steady routine that you can maintain is more useful than a short period of intense training followed by a long break.
Keep the early sessions manageable, respect recovery and let your progress develop at a pace that suits your body.
14. Keep your progress

Your first running goal should be a routine you can repeat without pain, excessive fatigue or constant changes to the schedule.
Start with walking if necessary, use short jogging intervals when you are ready, and keep recovery days between sessions.
Eat normal balanced meals, drink water according to your needs and use equipment that feels comfortable.
As your fitness improves, extend one part of the training at a time.
The most useful measure of progress is whether you can complete a session with control and return for the next one feeling ready.
You may reach continuous running in a few weeks, or you may need a longer period of walking and intervals.
Both are valid ways to build fitness.
Keep the plan flexible, pay attention to symptoms and let consistency determine how quickly you advance.
Frequently Asked Questions
How long does it take for a beginner to run 5K?
Can I run every day as a beginner?
Is running on a treadmill easier than running outside?
Should I run before or after breakfast?
Do beginners need a heart rate monitor?
What should I do if I cannot finish the training plan?
Sources6
- Runner's World on beginner running intervals
- Academy of Nutrition and Dietetics on runner nutrition
- Johns Hopkins Medicine on runner nutrition
- OHSU on running footwear and technique
- Berkshire Healthcare on returning to running
- NHS on the Couch to 5K running plan
External pages are independent third-party sources. Desking App does not control or endorse their content and accepts no responsibility for it. Visiting them is at your own responsibility and risk.